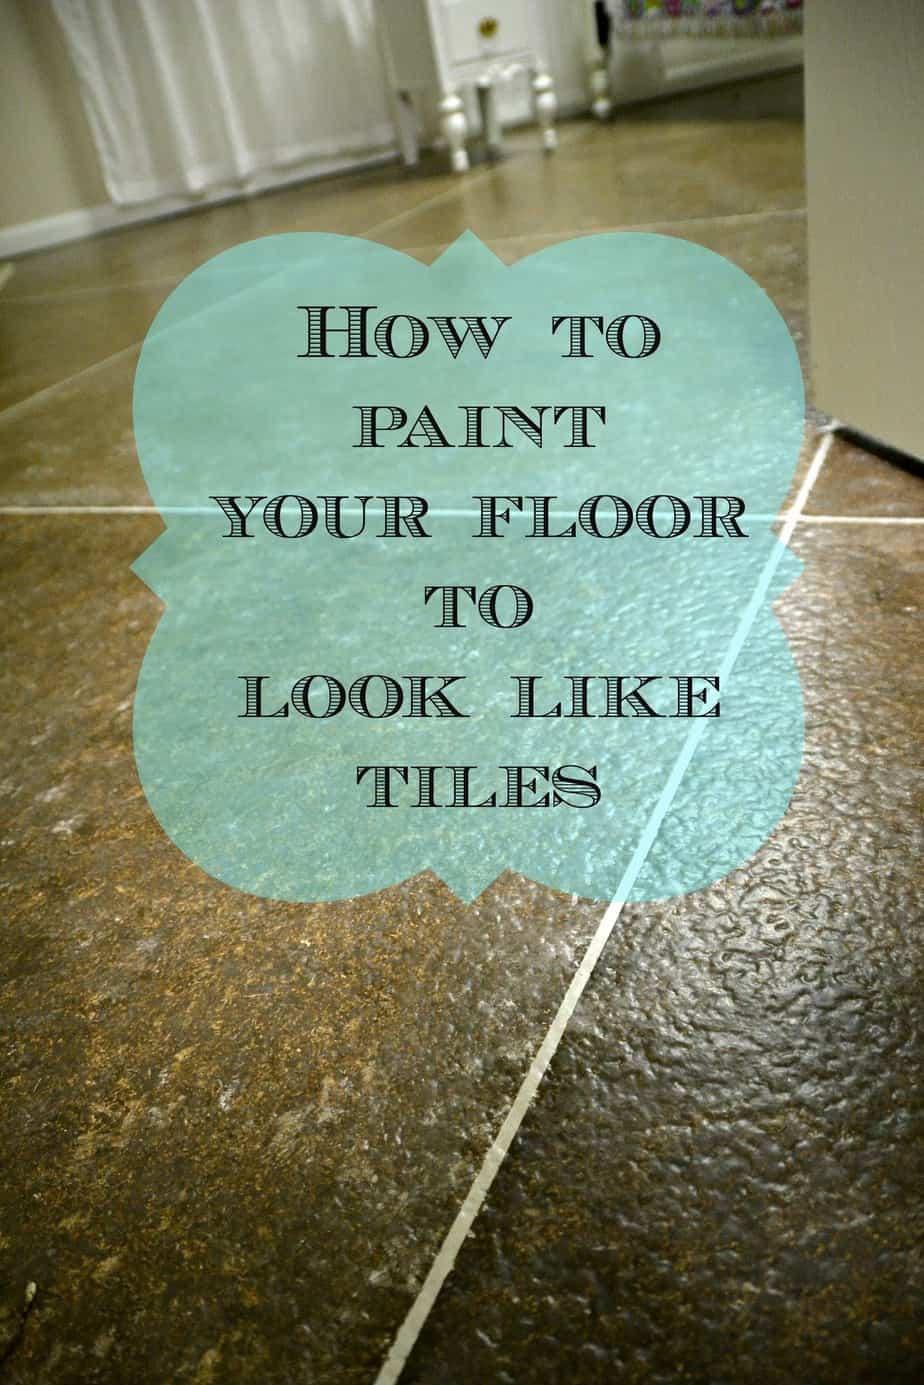
DIY Faux painted tile floor
This post contains affiliate links for your convenience. If a purchase is made after clicking one of the links I might make a small commission. Your price does not change. For full disclosure, go here.
One of the latest projects I finished at our house nearly finished me. Being Miss Independent and an “I’ll do it myself” kinda gal gets me into these situations sometimes. And I just don’t understand how some of these projects seem to take on a life of their own.
The painted floor project wasn’t really a big project, it just took a long time making it look the way I had envisioned it. But the end result turned out even better than I had hoped.
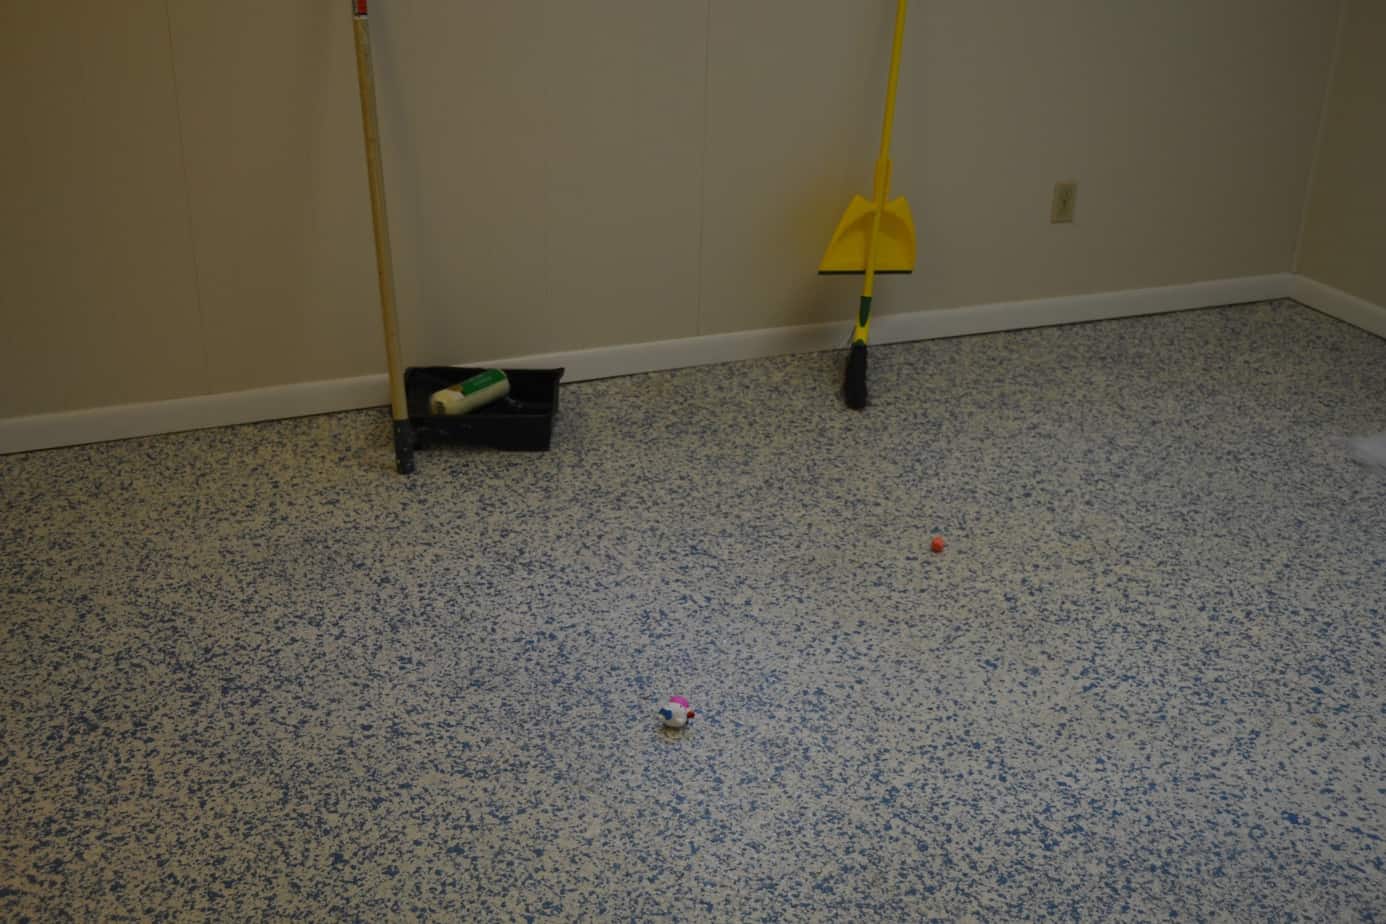
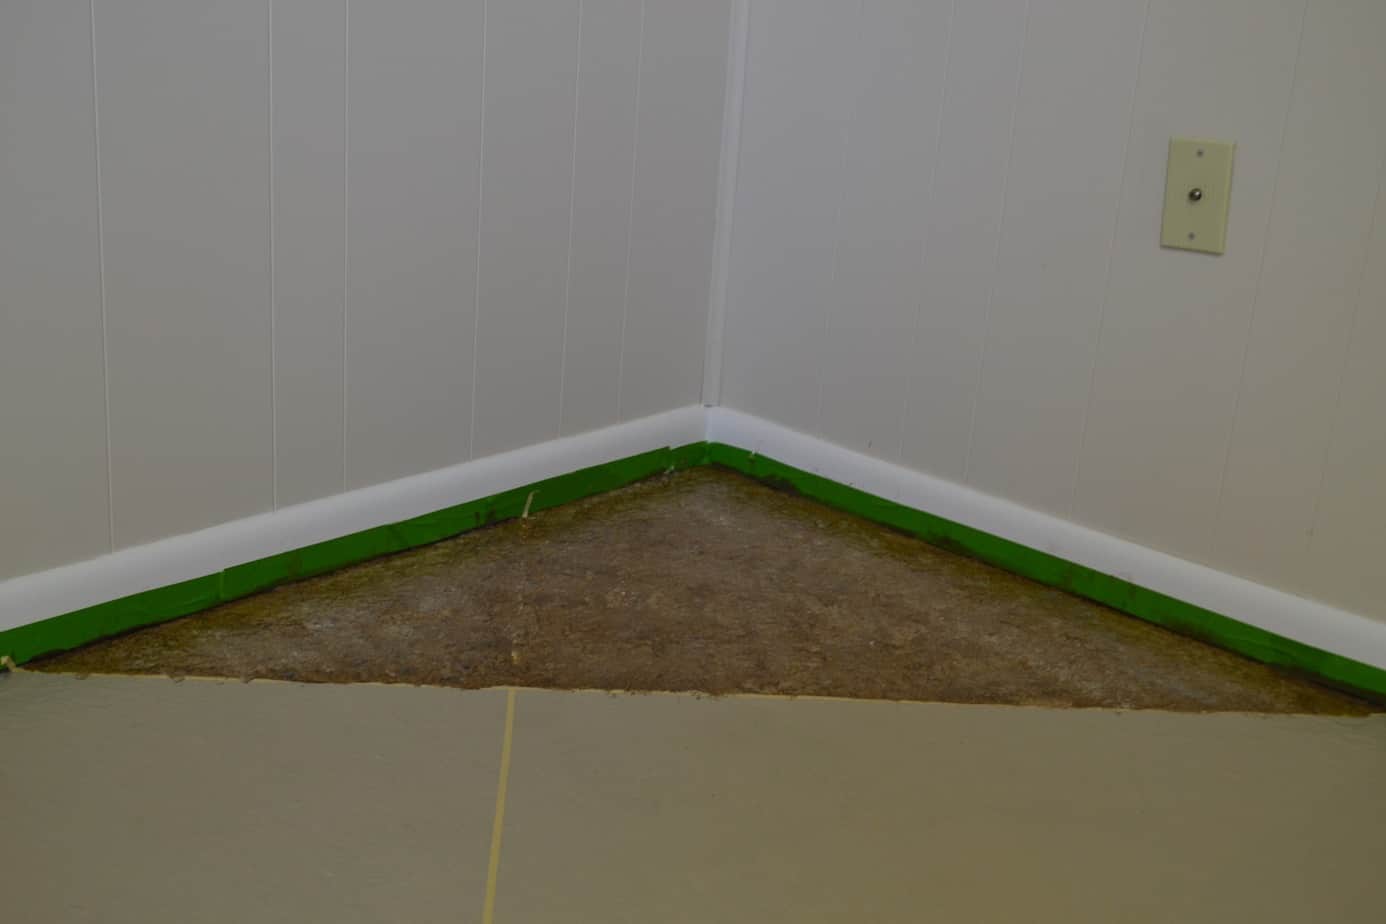
Anyway, the basement floors in our house are hideous. They are some type of poured epoxy and colored flake floor. The bedroom, office, and hallway have an ugly cobalt blue and white, but luckily the living area and kitchen have a goldish color that’s tolerable.
This type of floor was popular in the 60’s when the house was built. It will NEVER wear out. I gotta give them credit there. But that doesn’t mean I have to like it or live with it.
I decided the most economical and durable fix for the floor would be to paint it. Having a solid color paint on the floor didn’t appeal to me, so I decided to faux paint it in 4′ x 4′ diagonal tiles.
I cleared out both closets that had all of my off season clothes, removed all of the furniture from the room, cleaned the floor, and went to work on making the room look better. Did I say that the floor was hideous?
Here’s the “before” picture. Lovely, no?
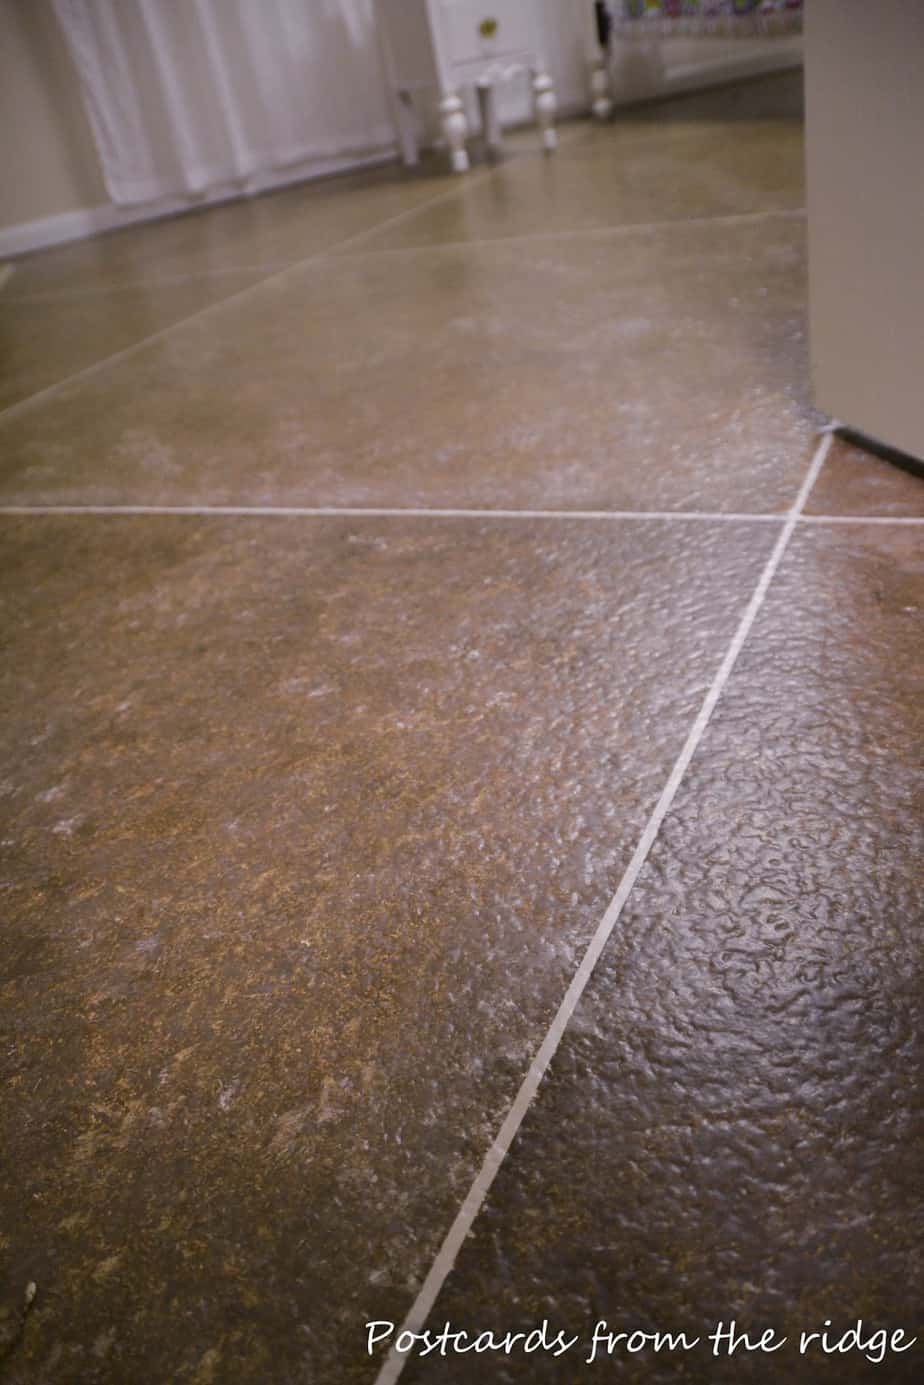
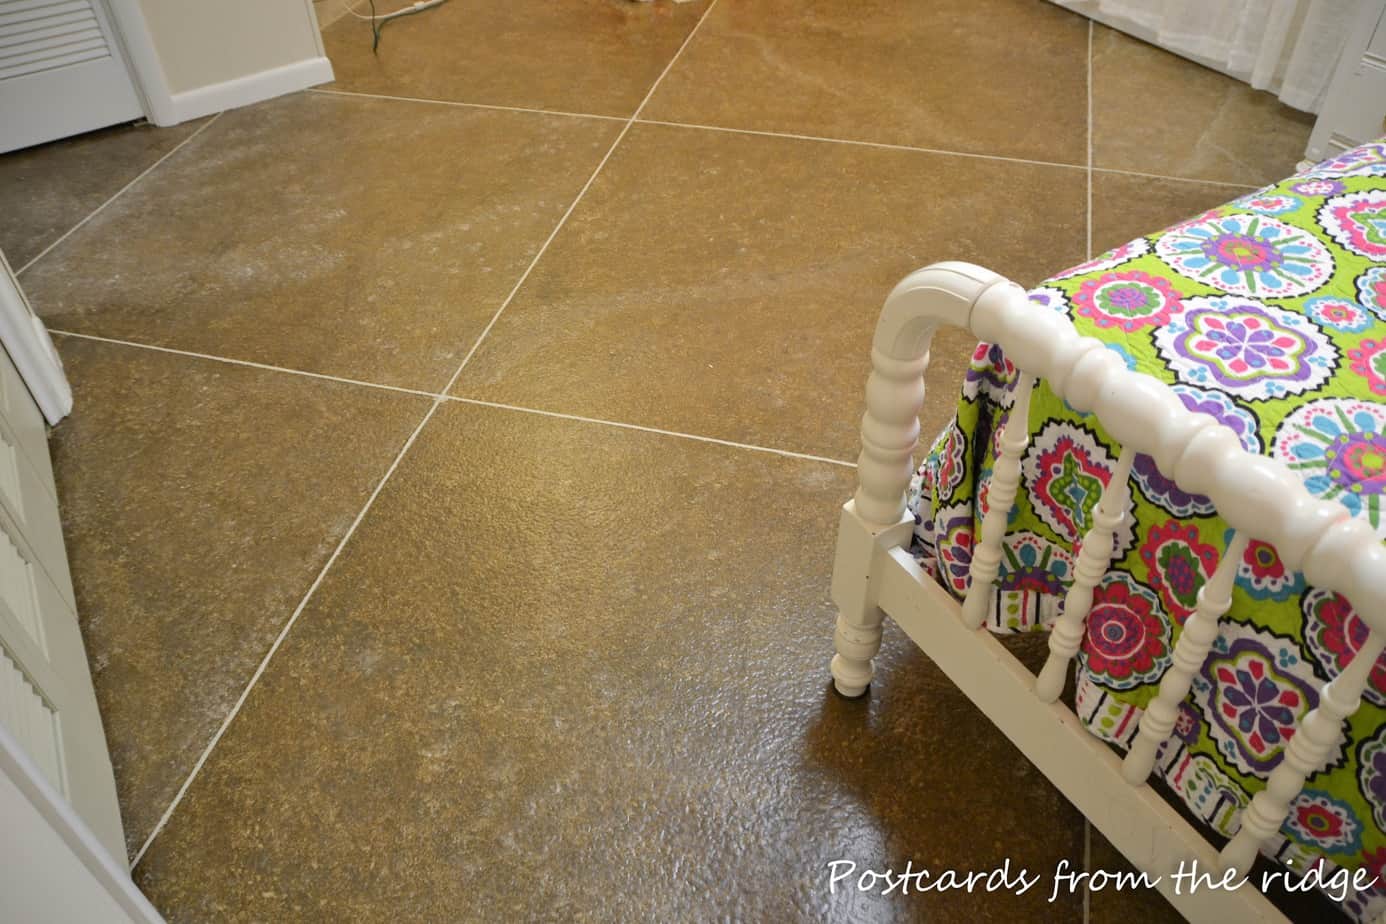
And here’s how I transformed it to look like large stone tiles.
How to paint a floor to look like tile
Supplies needed:
Note – I always recommend investing in good quality tools and paints. Cheaper paints require more coats which means you have to buy more, thus you don’t really save any money. Better applicators give you a nicer finish (no fuzz from roller covers or loose bristles from brushes) and if cleaned properly can last for years.
- pre-paint cleaner
- painter’s tape
- pin striping tape
- roller kit
- roller tray liner
- extension pole (this will save your back)
- angled paint brush
- primer
- acrylic floor paint
- miscellaneous acrylic colors for the glaze coat
- clear acrylic floor finish
- additive to extend drying time for glaze mixture
- sea sponge
- knee pads (trust me on this one)
Go HERE to for all of supplies needed.
Instructions:
1. Clean
Before you start this project, you’ll need to give the floor a good cleaning. I recommend cleaning it with this product. Let it dry completely before painting it with primer.
2. Tape the edges
Tape off your baseboards with painters’ tape to keep paint off of them.
3. Prime the floor
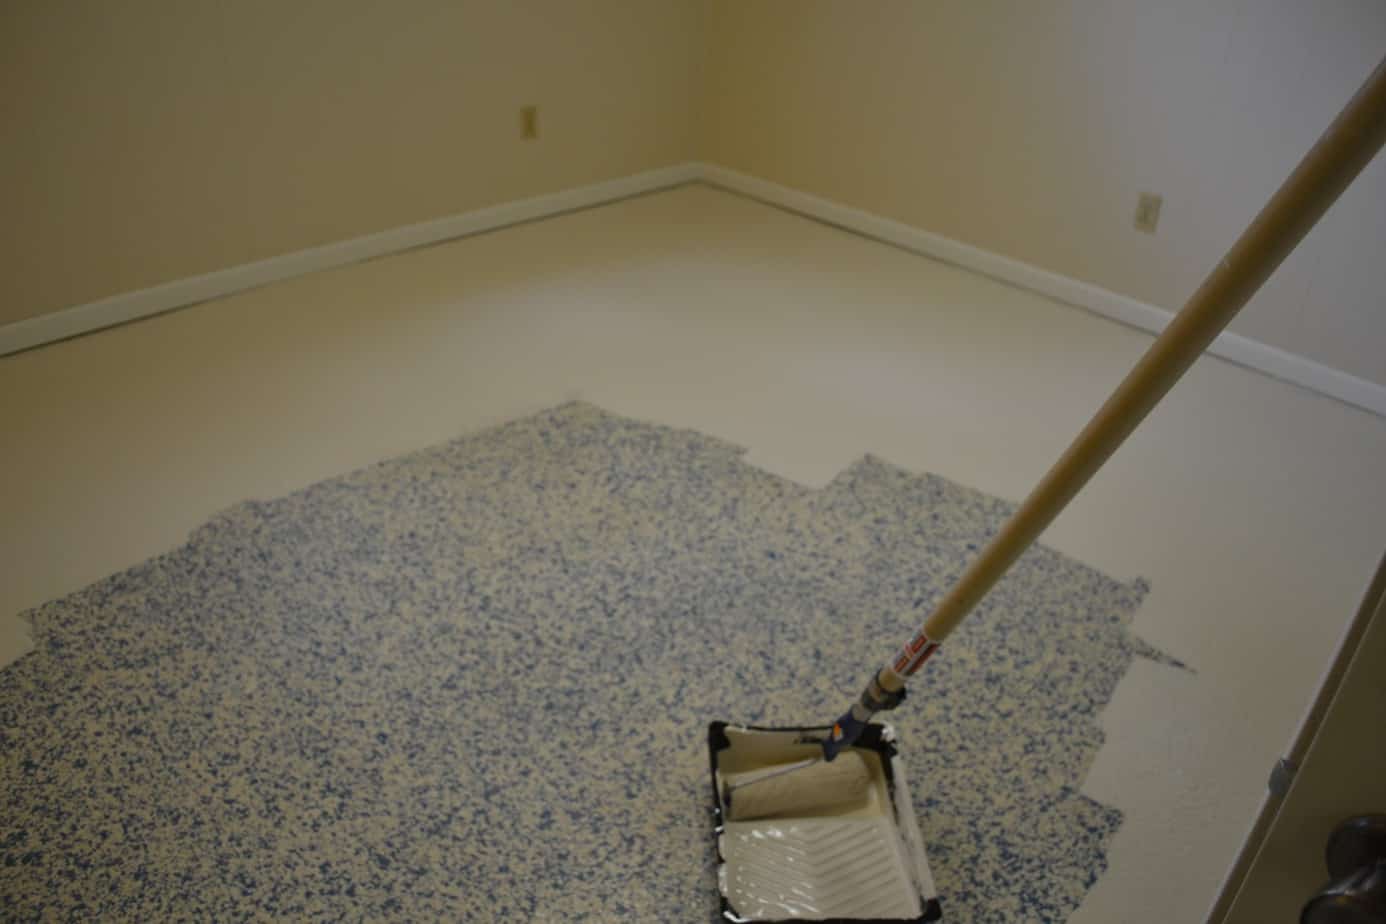
Once the floor is dry, prime it with an acrylic bonding primer. I recommend and use this one. Apply it with a roller kit, attaching the roller frame to an extension pole. Note – use a tray liner inside the roller pan for easier cleanup.
Use an angled brush to apply to paint next to the baseboards.
4. Apply a base coat of floor paint
Now apply a coat of Floor and Patio finish. Mine was tinted to Benjamin Moore Pashmina. This will be the color of the “grout lines” at the end of the project. It’s a light taupe color. I let this dry for 2 days.

5. Tape off your squares
Next step, measure and tape off the squares. (The tapes lines will be grout lines when the tape is removed at the end of the project.) I recommend using this 1/4″ pin-striping tape for the grout lines. NOTE: I went to a local auto shop and bought 1/4″ masking tape and it didn’t remove well. I’ve used the one linked to above on various painting projects and it comes off without pulling the paint with it.
I chose to do 48″ squares, mainly because it took less time than taping off 24″ squares. I had to re-do some of the the tape lines at least once because they weren’t straight. So you want tape that is repositionable like the one I recommended above.
6. Mix your glaze coat
I mixed a dark taupe, satin acrylic finish paint with a clear acrylic polyurethane for the glaze mixture, using a ratio of about 1 part paint to 4 parts polyurethane. I recommend adding this product to the mixture to extend the time you can work with it once you apply it. You don’t want it to dry too quickly.
7. Apply the glaze coat (starting next to a wall) and sponge it off
For this project, I brushed on the glaze mixture one square at a time, and then immediately began using a damp sea sponge that I had dipped lightly in an off white and black and just “pounced” the
sponge on the floor until it produced a pattern that I liked.
I used the black and white very sparingly, just to get some variation on the colors and to make it look more realistic.
Note: if you’re doing large squares like I did, don’t paint the glaze over the entire square at once or you won’t be able to reach all of it. Work your way across each square, then start the next one.
After the far edges of the room were completed, I then did the middle squares until I worked my way out of the room. Be careful and don’t literally paint yourself into a corner (now you know where that phrase comes from).
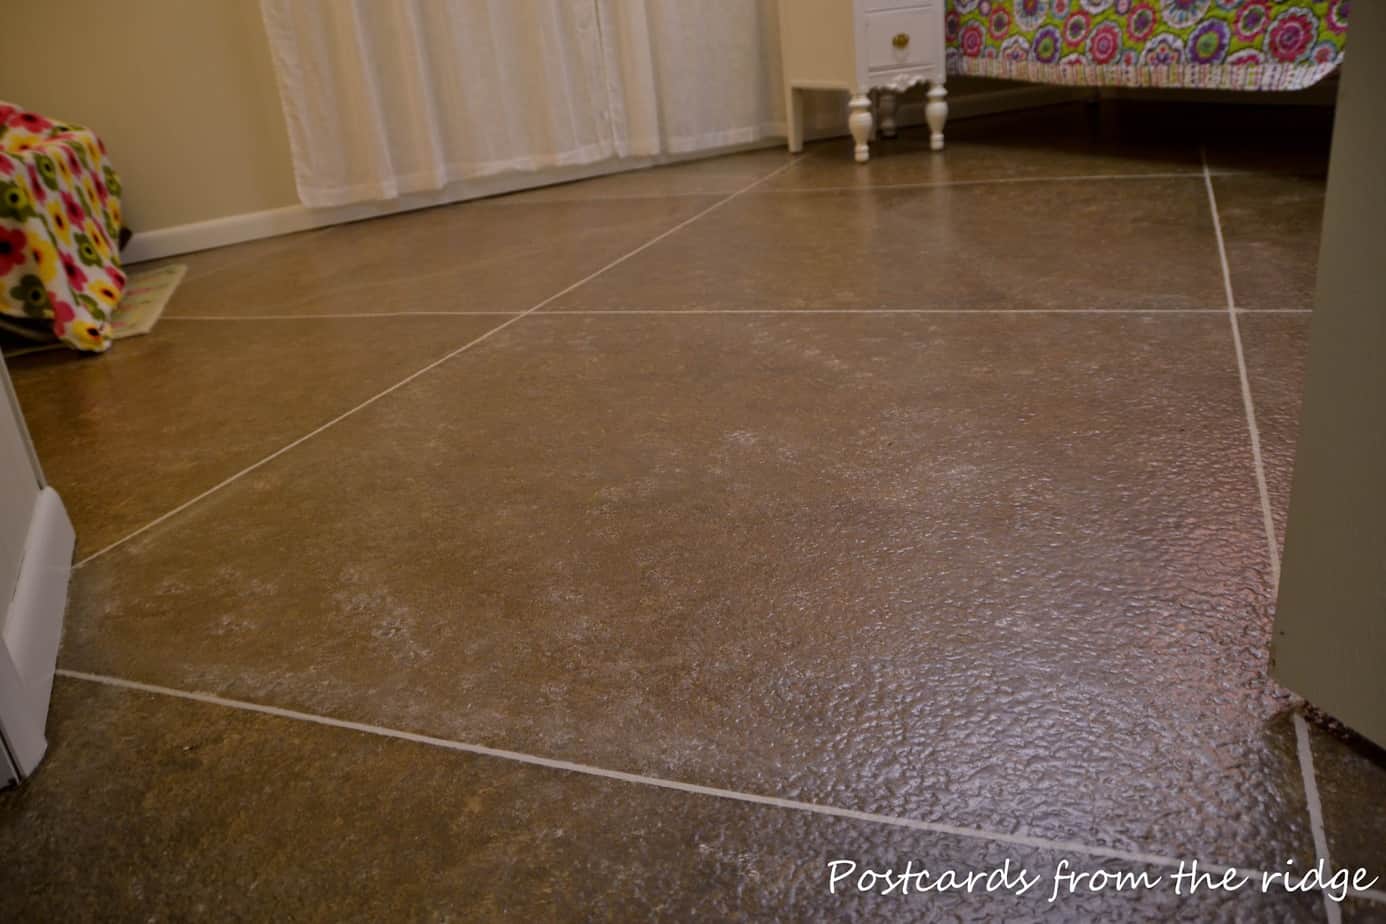
8. Remove the pintstriping tape (grout lines)
I would recommend removing the tape while the glaze is still wet. I had to touch up the grout lines, but it wasn’t too difficult. I just used and artist brush and the “grout” color which I had painted the entire floor with.
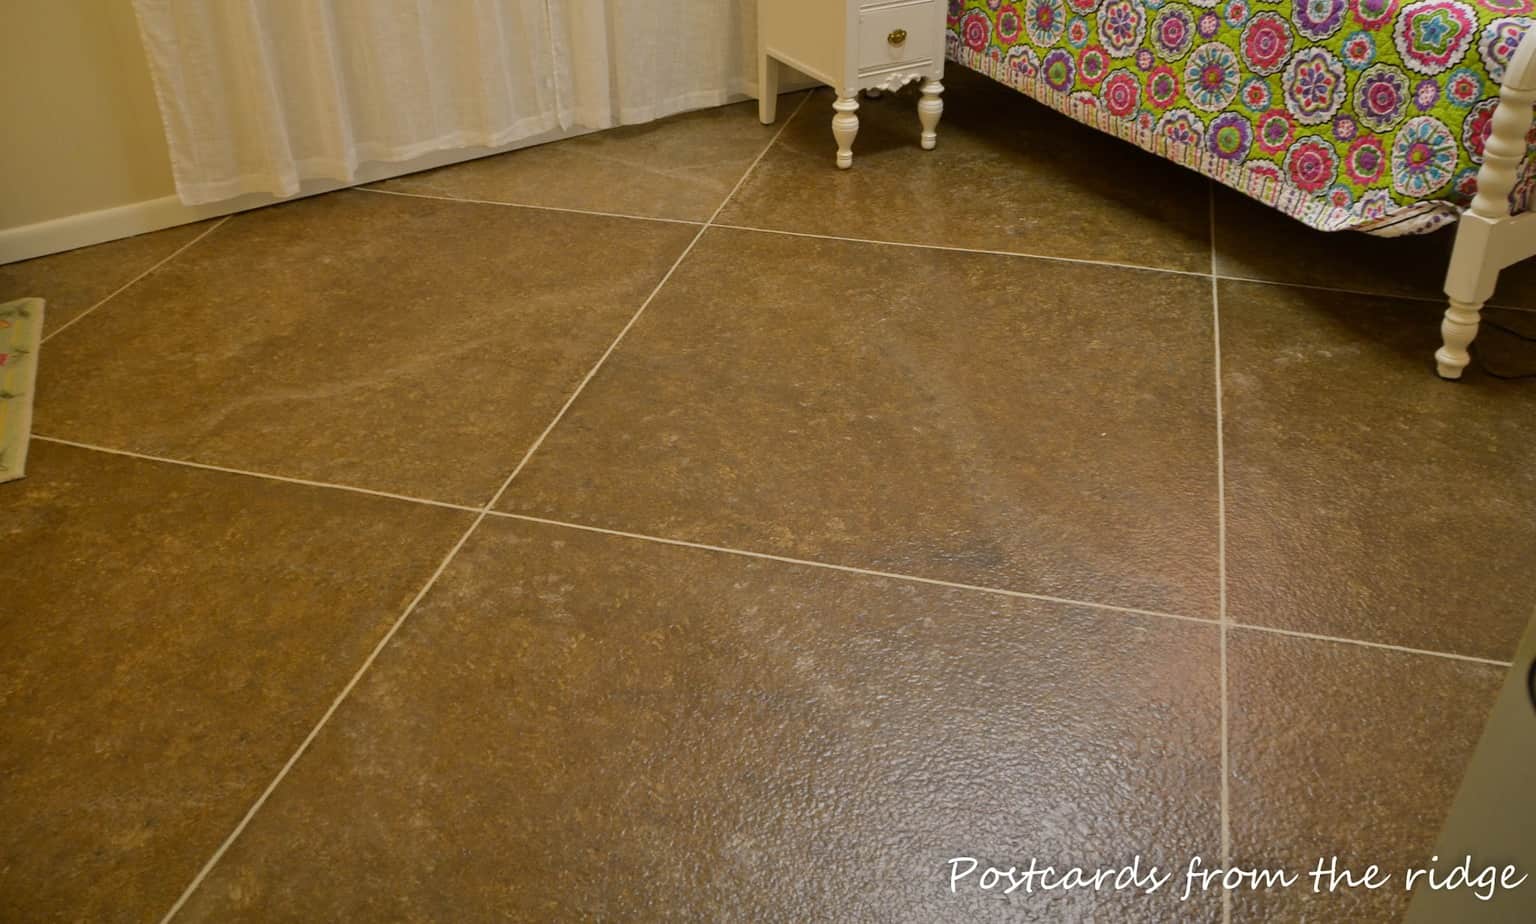
The finished floor.
My husband wanted me to paint the entire basement like this when he saw
how cool it turned out.
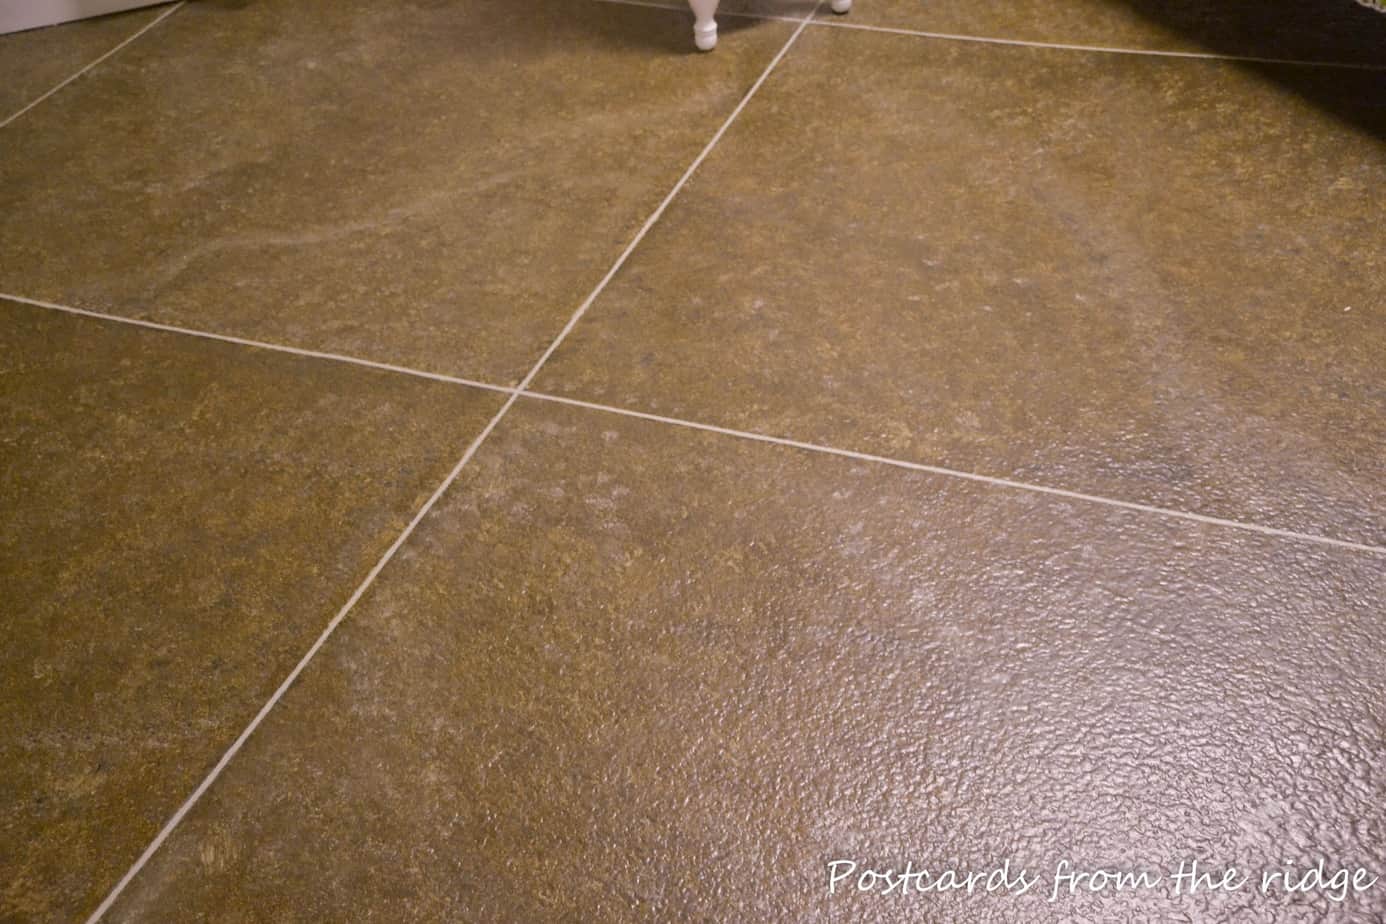
I like the way the texture looks on it. Everyone who sees it thinks we had giant tiles installed.
Word of advice, wear good knee pads. I have good knees and this project was somewhat painful. And go ahead and schedule a massage while you’re at it. Anytime you’re working on floors is just going to make you sore and stiff. And you always need a massage anyway, right?
Let me know if you do this project and how it turns out!
Update: this project was completed in January of 2012. As of August, 2018 the floor is holding up great and still looks like this.
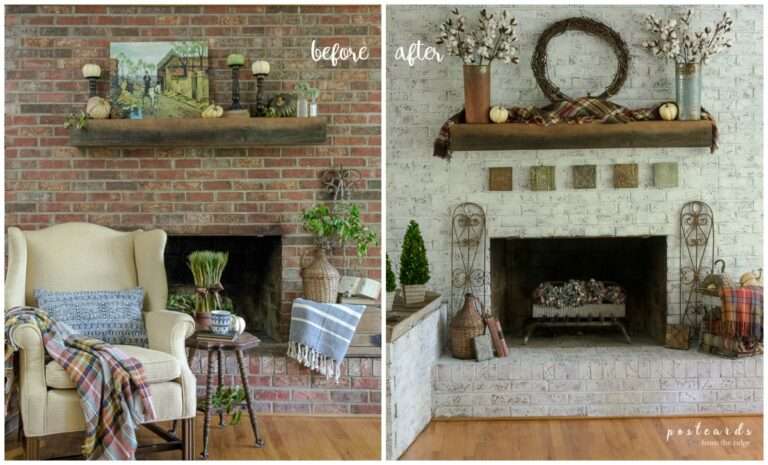
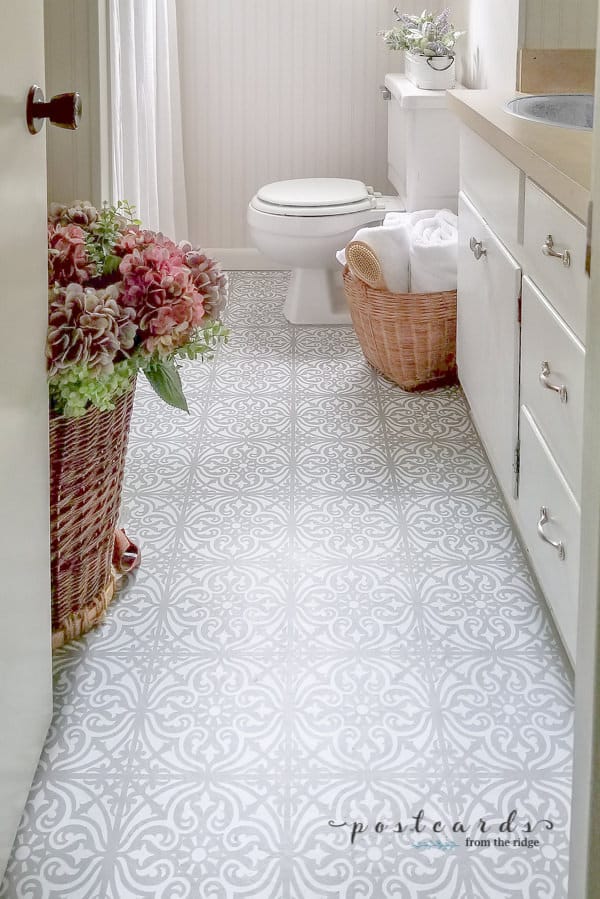
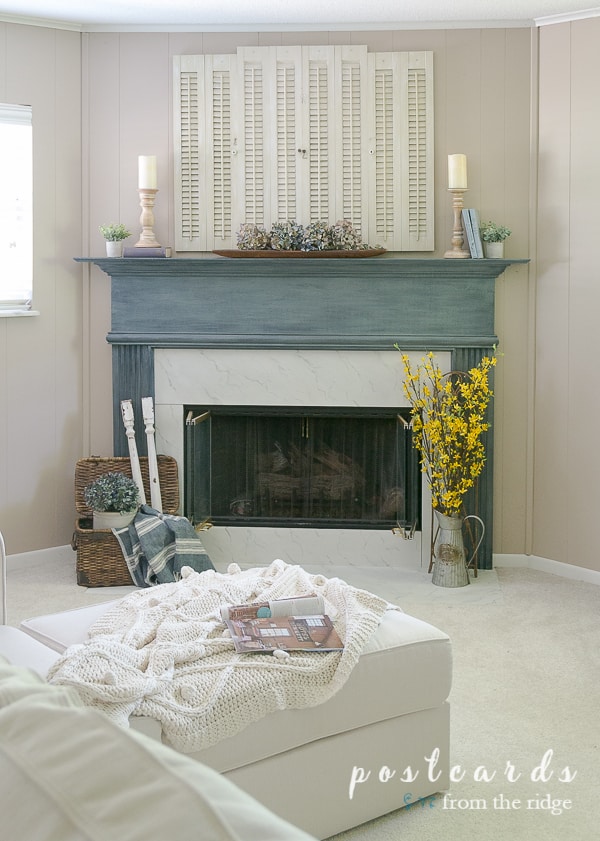
More paint projects


Wow! I'm impressed … and you truly deserve a massage and a mani/pedi after that project! So glad you'll be linking up next week!
Linda
itallstartedwithpaint@gmail.com
Haha! Thanks for visiting! We always deserve a good massage no matter what we've been working on, don't we? I think so!
Your floor really does look amazing. I love it. Wow, tons of work, but the result is fantastic. Hugs, Marty
Thank you. It was a time consuming job, but we love the way it turned out. Thanks for stopping by!
Awesome job!!!
Oh my, this is awesome! Well worth all of the work!! I can't wait to see you all linked up on the 31st!
Thank you! It wasn't too difficult, but but it did take me a while to get motivated to finish it. Thanks for stopping by!
ByeBye sunroom floor!
🙂 Haha. You could do this treatment on concrete or probably even vinyl. As long as you prime it first and use a floor paint, the possibilities are endless. Good luck! Let me know how it turns out. Thanks for visiting.
This is an amazing project! WOW! You did a fantastic job. So nice stopping by to visit with you!
Kindly, Lorraine
Thanks so much. So glad you stopped by to see it.
You are a ROCKSTAR! You are so talented! I absolutely love the floor! I would not have known it was painted tile, unless you had posted this! I can't wait for you to link up the finished project on Tuesday!
blessings,
karianne
Aw, thanks. It actually turned out better than I had hoped. Just need to put the finishing touches on it. Thanks for visiting.
I love this Angie! I'm going to show Tony and see if we can do this on our ugly kitchen floor. You did a great job!
Jen
Glad you like it! As long as you prep and prime the floor correctly, you shouldn't have any problem. Good luck. Let me know how it turns out. And thanks for visiting!
This looks great, Angie! Thank you for sharing your wonderful project at Potpourri Friday!
Thanks for being a great host! I'm just getting going with the blog and am glad to find your site. Thanks so much for visiting and following.
Um, this is truly amazing! I was just trying to figure out how to paint my ugly vinyl kitchen floor! Thank you for sharing!
Melody
ChattyChics.com
Thank you. You should be able to do it on your vinyl floor. Just make sure there's no waxy build up or any type of coating that would cause paint not to stick to it. Clean it good, prime it with a high quality acrylic primer, and coat it with a paint or polyurethane that's made for floors. It's not a long-term, permanent solution, but a pretty inexpensive fix for an ugly floor. Good luck! Let me know how it turns out!
It looks amazing! You did a great job! I know it was hard work. Like you, I am always getting myself into these "easy projects". LOL
You did an awesome job!
Thanks. I probably made it a little harder than it should have been. But I tend to do that. Thanks for visiting.
Wow – your hard work really paid off! I think I need to do that in my basement!
Kelly
I wish I had the energy to do our whole basement. For now only this one room looks like this. And it makes the rest of the basement look even worse. Oh, well….future project. Thanks for stopping by. Love your blog, BTW.
Amazing!! I love how it turned out!! Well done!Thanks for linking up at Feathered Nest Friday!
Thanks for hosting each week! You've got such wonderful ideas on your blog.
Great job! I'm sure that was an overwhelming job, but the outcome is amazing. Thanks for linking up to the PoPP… I'm featuring you in the Spotlight this weekend.
Wow! Thanks so much for featuring my project. I literally just found your blog 2 days ago and love it (I'm fairly new at this blogging thing). I'm ALWAYS painting something, so I've got a feeling I'll be linking up again in the future! Thanks again. ~ Angie
I am blown away. Those tiles look so good and real. I had to link this on my facebook page and share it. I am your lucky #13 follower. 🙂
Thanks! And thanks for following and especially for sharing! I just became your 1199th follower. I hope my little blog my will grow up and have even half as many followers as yours someday! Thanks again. ~ Angie
That's.Freaking.Awesome.
I'm Pinning and Favoriting and anything else I can do so I don't forget about this amazing flooring!!
You so rocked this project!
And….. I'm gonna follow you because you asked so nicely!!!
Have a great weekend! Can't wait to see more of your projects!!
Hugs ~~ Suz
inspiringcreativeness.blogspot
Thanks for the kind words. And thanks especially for pinnie, favoriting, and following my blog. As you can see, I need followers. I'm just getting going with this blog and can use all the love I can get! Thanks again. Enjoy your weekend!
Angie
Pinning, not pinnie. 🙂
You've just inspired me to get started on my own painted floor project! I've been thinking on it for ages, but yours is awesome and I want it!!
That floor looks amazing and well worth the annoying tape and damaged knees! Thought that's easy for me to say huh! lol.
Looks good though, just like you've laid giant floor tile.
Thanks for sharing!
http://coachhousecraftingonabudget.blogspot.com/
Thanks. It wasn't too bad on the knees. I was just a bit stiff and sore for a day or so. Thanks so much for stopping by.
Angie
WoW! That is AWESOME! You did such a great job on that floor! Really fabulous. Thanks for sharing.
Thanks! Glad you like it. Thank you for stopping by!
Holy cow on a pogostick, woman! That is one major difference! I love the color choice. When I saw the thumbnail I thought it WAS giant tiles. You can imagine my surprise when I realized you painted all that. It looks really lovely!
It is a big difference, thankfully! Thanks for the great comments and for stopping by.
AMEN!!! WOW!!! Your floor transformation is spectacular. You did a wonderful job.
I am your newest follower. Would love it if you would follow me back.
Visiting from Home Sweet Home Party.
Thanks for the kind remarks and for following! I'm following your blog now,also.
Love, love, love the floor! It looks amazing! Also a new follower.
So glad you like it. Thanks for visiting and especially for following!
the results are stunning!
Thanks! I'm glad you like it!
Fantastic post! I am your newest follower — follow me?
I feel your knee pain. I have done similar jobs, but the one I posted today is just the easy way!
Thanks so much for stopping by and for following me. Your floor project looks great, too! I'm following you also.
Angie
Very cool! But probably not so fun to do! Don't worry, you will look back and forget the pain (kinda like having kids!) and only remember the result! XO Cindy
Yes, thank goodness we forget unpleasant things like knee pain and childbirth, right? It's totally worth it in both cases. Thanks for stopping by!
Great Project- the results are amazing!
Thanks! I'm glad you like it!
Wow, what hard work, but the results are fantastic! I'm visiting from the "Impossibilities" linkups, and would love it if you would share this at my linkup party and giveaway going on now @ the Delectable Home.
Thanks! Sure, I'll link it up. Thanks for stopping by.
Oh wow, I know it was a lot of work, but I'm sure it was so worth it! Your floor is fabulous, it definitely looks like tile. I'm now your newest follower!
Thanks, Sherry. It's amazing what you can do with paint and a little imagination, isn't it? Thanks for following. I'm following you as well.
Angie
Thanks so much for linking up and taking the challenge … and wait a minute, I'm pretty sure I saw you featured yesterday?! Why am I not surprised?
Again, WOW!
Linda
itallstartedwithpaint@gmail.com
Thanks again! And thanks to you and the other blogs for such a great blog hop. What a great motivation to get the job done!
Holy cow! That's awesome! I love painting floors and this is a great tutorial/project! Amazing result! It's gorgeous!
Nice to "e-meet" you! Thanks so much for introducing yourself today! I'm your newest follower too! 😉
Roeshel
Thanks! Glad you like it. It's nice to meet you too. And thanks for following me!
Angie
I stopped by last week…..but I just wanted to tell you one more time what an incredible transformation! You truly have accomplished your "impossible."
Thanks for participating in our party!
blessings,
karianne
Thanks so much for stopping by again and for co-hosting such a wonderful party.
Angie
Ummm can I just say WOW! That is amazing!
Thanks! I'm glad you like it.
Angie
Goodness me! That is fantastic! I think of all the projects on this Impossibility challenge it's the DIY ones that amaze me most, because I'm such a klutz at anything like that, and absolutely hate it! Those "tiles" look fabulous. If I was still a 12 year old I'd've moved in before you'd finished!!! Congratulations!
Thank you! She still hasn't moved in. I've been teasing her and saying that her dad and I are going to claim it for an exercise room if she doesn't move in soon. Either way, it's a big improvement over what it used to look like. Thanks for stopping by!
Angie
What a TRANSFORMATION. Huge kudos. I was really fooled and thought that you installed travertine tiles. The floor looks absolutely gorgeous, and I would love to have them in my home! Congratulations!
Thank you! It looks so much better in there! Thanks for visiting!
Angie
So great to get another look at this, I'm still so impressed – what a great result!
Thanks so much for joining the challenge!
Karah
Thanks again. And thank you for hosting the blog hop. What a great idea and a great motivator!
Angie
This looks absolutely fabulous! I'm so proud of YOU! I am inspired to think outside of the box 🙂 <3 from your newest follower and fellow {new} blogger 🙂 Please check out my impossibility and follow back!
~Misty
http://www.413sparrowlane.com
Thanks! It's always good to think outside of the box. It saves money and gives you a unique look! Following you also.
Angie
I am stunned. That is absolutely amazing. So gorgeous and creative! You had a good eye and a nice touch to simulate that look so nicely.
Thank you. It took a bit of work, but I'm pleased with the way it turned out. Thanks for visiting.
Angie
It really is a wonderful end result. Why not paint the entire basement??? You've got it down now, right!? Lol. I like how it turned out!
Well I guess I can paint it when I have about an extra week of time on my hands. Lol. Thanks for visiting.
angie
Your floor looks fabulous!
Thanks!
Wow, this is an amazing project…totally transforms the space…and you did a wonderful job of faux painting! It truly looks like tile! Hopped over from the Impossibilities party!
Thank you! And thanks for stopping by!
Wow, that is an amazing job! I did that once years ago to a patio, but I love the texture of yours.
Thanks. The floor already had the texture, but the paint made it more noticeable. Thanks for stopping by.
Angie
Hopped on over from the Impossibilities party… that is so amazing. I would have swore that was tile. I love the the whole look and the variations in it. Very nice job.
I can't wait to see what else you are up to so I became your newest follower.
Hugs, Deb
Thank you for the kind comment! I appreciate you visiting and following!
Angie
LOVE this floor! I may do something similar for my sunporch floor! Thanks for the inspiration!
Glad you like it. Let me know if you do it, and how it turns out. Thanks for stopping by.
Angie
I'm in love…with your floor!
I really did think it was tile.
(AKA Just shoot me now) – LOL!
I think you did a fabulous job and I'll be bookmarking in case we decide to do this for our basement.
Can you believe there are so many of us "Impossible" gals out there?
~ Dana
Cooking at Cafe D
"Jimmy John's Kitchen" Project
Thanks! It's not too difficult, but takes a good amount of time and patience. There sure are lots of us impossible gals, that's for sure. Thanks for visiting.
Angie
Girl, this is some kinda fabulous! Great job. I am now following you, cause' you are awesome…stop by and share the follower love, Lori
Thank you! I'm following you too, now.
Angie
great job on your floor! At the risk of aging myself, I remember when my parents installed a floor like that in our kitchen. I is call "Torganol" and was a poured floor. I remember how bad it stunk for several days.
This is absolutely fantastic!! I am one of those who does things like you mentioned in your post. So you definitely get an Amen here. This is back breaking knee pain work for sure and they look like real tiles. I would love to have you join my weekly Wow us Wednesdays party. Popping in from Debbiedoos.
Thanks for visiting! It seems like I'm always taking on some type of crazy project and then wondering "what was I thinking?" before I finish it. I guess we're just wired that way! I'd love to link up. I follow your blog and love the things you're always doing at your beautiful house.
Angie
I featured your floor today. It is amazing work! See you later for another newbie party.
Thank you so much! It's so nice of you to host a link party for us "newbies". Your blog is wonderful. Hopefully mine will grow up to be half as good as yours! Thanks again.
Angie
So very lovely! That Jenny Lynn bed is adorable too. I have a party on Saturday's that I would love to see you at. Take care of those knees :0)
I would love to see what your next project might be.
You do know that after you complete a major project like that and it comes out so beautiful, you will think that there is nothing you can't do now? LOL
Great job!!!
Judy
Great Blog!! That was amazing. Your thought processing is wonderful. The way you tell the thing is awesome. You are really a master.
Hardwood Flooring Lowell MA
Unbelievable…all your hard work…so worth it!! Fantastic job…and that is coming from a professional painter. Love how you write.
Wow, thanks. A compliment coming from a pro is especially nice. And thanks for commenting on my writing. I find myself tweaking that as much as anything. Thanks again for the kind words and for stopping by.
Angie
WOW–very impressive and so realistic. Love it. I am your newest follower!
What a fabulous job! Congratulations! That being said, I feel like I should make a huge blog banner that says DONT PAINT YOUR FLOORS IF YOU VALUE YOUR SANITY and your back. You want one too now, right? 😉
Great post. Quit tweaking your writing. You're spot on.
Your floor turned out beautifully! Working on floors and ceilings are the worst..but usually well worth it in the end! Hope you recover! 🙂 I am a new linky follower and I would love to have you share this at my party…going on now!
LOVE, love, love the floor! I have been wanting to do something like this in my basement and thought I would have to clear everything out, stain ans epoxy, but this seems doable to me! GREAT JOB!
Love this idea. I too did this to a floor. My floors where chipboard (underlay for the carpet we removed) I used oil paint and it turned out very well. People actually got down on their hands and knees to feel it when I told them it was painted. We have since tiled it for real but it was wonderful as an in between from the soiled carpet until we could afford to do something more permanent.
Well this is just amazing. I admire someone who is willing to tackle a job this ambitious regardless of the outcome, and it turned out, well, just AMAZING. Very inspiring. I'm a follower!
Wow. This is amazing! I have about 1000 sq ft worth of ugly flooring to deal with and I'm thinking this is the cure. You did such a beautiful job – you should be so proud! I'm wondering, how long were the "dry times" for each step? You said 2 days for the primer and another 2 for the paint. But, what about the next step(s)?
Thanks for sharing your great project!
Hi. I allowed the final coat to dry for probably 48 hours before we walked on it, but I removed the pinstriping tape while the paint was still wet so it would come off cleanly. Hope that helps! Good luck with your project. Be sure to let me know how it turns out. ~ Angie
Hello!
I was looking online for possible ways to make my painted floor idea happen, and voila! I happened upon your great blog! Beautiful floor, and thank you for sharing the details of the process. I am wondering if you might be able to share your thoughts on the "do-ability" of my floor idea.
I have a bathroom floor that I hate. Its linoleum. I should add here that I rent this house, so one of my biggest concerns is not spending a fortune on something that I will move out of sooner versus later. The landlord doesn't mind my doing any upgrades.
Okay, so, I bought a good lot of tiles at an auction for $5 – mainly for a few that I loved in the bunch. However, I don't have enough of those for this bathroom although its small. But I still have the rest of the tiles. I then saw that tiles that I absolutely love, and therefore need 😉 at Home Depot. and yes, they cost a fortune. A Black-Grey slate stone, swirled with a shimmering silver. Then I thought to myself – Can I paint the tiles that I already have to recreate the look I want?
I'd love to hear your thoughts!
I would say that you could probably paint them. Take one into a local paint store and get a recommendation for the right primer, and then you can use floor paint over that. You can create any design you want with paint. Just practice on a piece of cardboard first. Good luck! Let me know how it turns out! ~ Angie
Thanks for the detailed report, greatly appreciated. I realize it may have been here all along but not everyone does it! Georgeanne
Thanks Georgeanne! Have a great week. ~ Angie
Absolutely beautiful. What is the color you used for the top coat – the dark taupe. I really like the colors you chose and would love to replicate it in my family room.
The top coat was a mixture of clear acrylic polyurethane (Benjamin Moore Stays Clear)and Ben Moore North Woods Brown. The ratio I used was roughly 4:1, but you could change it depending on how much of your base coat you want to show through. I also sponged a little off white and black in there while it was wet, for variety and veins. Good luck, and be sure to let me know if you do it in your family room. I'd love to know how it turns out! ~ Angie
Such an amazing floor project! Thanks so much for sharing all your fantastic tips. 🙂 Megan
Amazing! Great work!! I wonder how you this work. Thanks for sharing this wonderful experience.
Congratulations….You have done a very difficult but very very impressed work. I have the same problem with my floor tiles in my country home. They are in a terracota colour but they are very rough. Last summer I tried to varnish them with a stone varnish and now have started peeling in some parts. Now the floor is uglier than before. I don't Know what to do. I have thought to place other tiles above the old ones. But there will be another problem with the doors etc….The whole area is about 70 cm….I don't know if I will manage to do…..And I don't know if my husband will allow me to do so. But I am really very jealous of your beautiful floor. Love and Kisses from Helen…Athens….Greece.
Thanks Helen! Good luck with your floor. I hope it turns out well! Thanks for stopping by! ~ Angie
Great looking floor!!
Thanks Bill! Happy New Year to you! ~ Angie
thanx for sharing! This floor is gorgeous! Do you think your original floors were 'terrazo'??? That's what we have here in this Florida house, built in the early 60's. Now I want to do this in the few bedrooms here that are still just terrazo. {Most of our home has laminate wood floors now… But, I LOVE the tile look you've done!} I look forward to viewing more of your blog… found you from Debbie Doo's.
Our floor wasn't terazzo. I'd be hesitant to paint that because I actually like the look of it! Ours is called something like targanol. It's a textured, poured epoxy floor with colored flakes added to it while it was still liquid. Very reto. Very durable. Very dated! Thanks for stopping by! And for becoming a follower! ~ Angie
I just bought the materials to do this after seeing this page this morning! Question though, I get that my first layer will be my grout line but the second layer… the associate at menards said I will put my mixed acrylic and polyurethane down as a full coat and then use the damp sponge to lift some of the paint while its still wet. Is that right?
That's right. Put the paint/poly mixture on one square at a time and while it's wet, you'll be sponging it off and creating a textured look. I would stongly recommend practicing on a board first to make sure you get the look that you like. It's not difficult, but you might want to get the hang of it before you start on your floor. Good luck! And please let me know how it turns out and send me some pictures when you finish! ~ Angie
Well I'm down to touch ups… I did this on all 1200 sq ft of our basement. A lot nicer than if I painted a single color and a lot cheaper than an alternative. Thanks! Glad I did this but even more glad I'm almost done!
That's awesome! You have much more patience than me. I did well to finish a 300 square foot room! I'd love to see pictures of the room. If you get a chance send some to me at postcardsfromtheridge@gmail.com. Congrats on the project! ~ Angie
Really impressed with your work, you have done a great job and the floor is looking fabulous, i will share this information with my wife, if she agrees we will also try this.
Thanks! The result was worth the effort. Thanks for stopping by, and let me know how yours turns out! ~ Angie
Hi this looks amazing, I'm very impressed! Thank for sharing, I will make an account here and follow your blog!
I would like to do something similar in a new house that I'm buying, it has Mexican Tile, regular tile and laminate. My idea is to rip off the laminate and paint the concrete, something like this project. I'm wondering if I can use the same paint for the tile floors as well… I would love to have the entire floor in the same color. Do you think that would work? Thanks! Sarah
Nice work .Thanks for the share. Keep up writing so that we can get more informative blogs like this one.
slate tile flooring
Nice Post !!!
Really did such a great job on that floor! awesome!!
Very, very nice job. We fully plan to do the same with an unfinished basement floor. I have a couple of questions for you, since it has been over 1-1/2 years from application.
1. Anything you would have done differently? You are still happy with products used?
2. Have you had any bad long-term effects on the surface? Yellowing, scratching, etc.
3. Did you have to re-seal, wax and what do you use for cleaning it?
Thanks, in advance.
Hi, and thanks! To answer your questions, 1. Now that it's been a while, no, I wouldn't go back and change anything. It took me a while to finish the job, but I'm slow and it was worth it. 2. No yellowing, but we did scratch it just a bit when a bed was scooted across the floor. I should have put felt on the bottom of the bed posts and that wouldn't have happened. 3. I haven't had to do anything to it since I used products that were made specifically for floors. For cleaning it, a damp mop works fine, but you could also use something a little stronger like TSP if you had lots of surface dirt on it.
Let me know how your project turns out. I'd really love to know about it!
Very, very nice job. We fully plan to do the same with an unfinished basement floor. I have a couple of questions for you, since it has been over 1-1/2 years from application.
1. Anything you would have done differently? You are still happy with products used?
2. Have you had any bad long-term effects on the surface? Yellowing, scratching, etc.
3. Did you have to re-seal, wax and what do you use for cleaning it?
Thanks, in advance.
Very, very nice floor, Angie! Now that it has been down for over 1-1/2 years I have a few questions before I undertake such a project.
I. Do you have any misgivings about the products you used?
2. Have you seen any long-term effects – yellowing, soft to scratch, blistering, etc.
3. Have you added another coat of sealer, waxed and what do you cleaning supplies do you recommend in cleaning it? Thanks in advance.
I'm thinking of painting my white ceramic tile floor and my yucky white ceramic kitchen counter tops. Would I use the same method you did for this?
I'm in love with this. I am needing to paint some floors so went to Pinterest and here I found you. I know I can't do it that nice but I'm sure going to give it a shot. I do have one question did use regular paint to sponge with or could I use those little bottles of paint you can get at Walmart like in the craft section???
That looks amazing! Glad to see the note you added just recently, that even several years later it still looks great. I've lived with foyer tile that I HATE, for over 14 years, and I recently realized that perhaps painting it is the solution! Wondering… you mention a few different colors that you used in the glaze coat, including white & black, are they ALL the same acrylic floor paint you link to in your supplies list, or did you mix in some other types of paint for the smaller amounts of added color?
Thanks!
You could use any type of acrylic paint, but I would use something that's pretty durable.
you may have answered this already? you made your glaze by mixing the paint ( doesnt have to be floor paint, but as long as its acrylic?) and poly together and then painted it on, next step sponging the black and white while it was still wet? did you need to seal it at the end or no, the glaze ends up sealing it?
Yes, I mixed paint with acrylic polyurethane that's suitable for floors. And the sponging was done while the glaze mixture was wet. It didn't need a sealer since the poly is made for floors. I hope that helps! ~ Angie
Hi Angie, Its been 10 years. How’s the tile holding up? What stain or paint did you use for the glaze? I’m trying to match real 8×8 light terra cotta tile. I figure a slightly larger size diagonal will match up. The effect you got on your basement is almost exactly the color and texture I need
I got lost in finding really cool stencils. But no time for that. Chalk line and 1/4 inch tape in simple squares is best.
Thanks.
Hi Tanya.
It’s still holding up great, but in all honesty the room doesn’t get much traffic these days. For the glaze I used 1 part dark brown acrylic floor paint mixed with 4 parts clear acrylic floor finish. I just updated the links in the post to current products that would work well. Also, you can vary to ratio depending on how opaque you want the glaze mixture.
Let me know how it turns out!
Angie